I have been a lot on Instagram lately and leading up to Christmas I can see alot of images there that are using double exposures and a lot of bokeh.
Bokeh is the quality of the area in a photographic image that is out of focus. If you are photographing you can see it as the blob you get if a small round light source is out of focus in an image. Usually it is roundish to oval, depending on the lens you are using, it can also be doughnut shaped. All those fairy lights and Christmas trees around now are really tempting to be used far out of focus, thus creating lovely bokeh. A really good article on bokeh can be found at Expertphotography and on Phlearn Magazine.
Double (or triple) exposure means that you expose two (or three) images in the same frame. With the good old film cameras that meant that you take one image, don’t wind the film forward and take a second image on the same place on the film strip. Digital cameras can do that, too, even with no “real” film involved.
So all of the images in this post are created in camera, with no help by Photoshop. I had a lot of fun experimenting with them, and so had the kids!
The first ones are simple ‘random’ double exposures, creating a mood – one very christmassy, the other very ‘city life’. The first image is taken with a Nikon 50mm 1.8 – creating heptagonal bokeh.

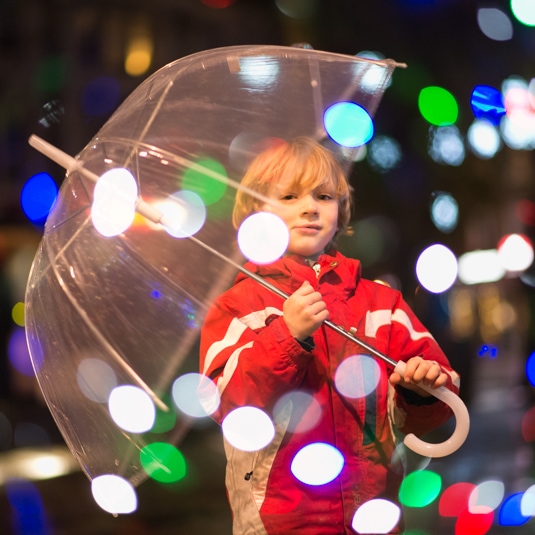
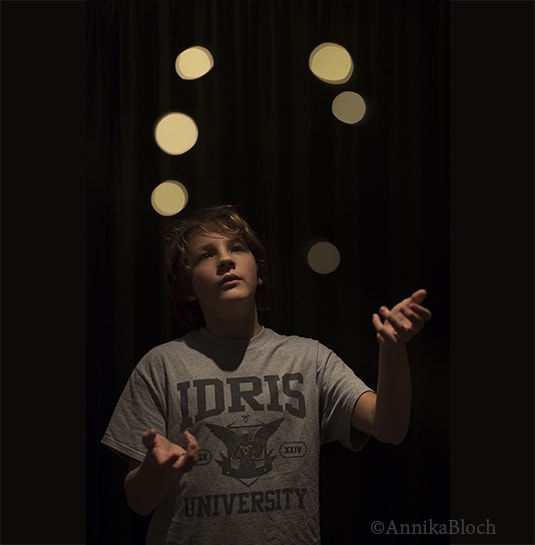
After this I was tempted to really connect the ‘bokeh balls’ with the underlying picture. Luckily, my son was willing to help…(Nikon 85mm 1.8)
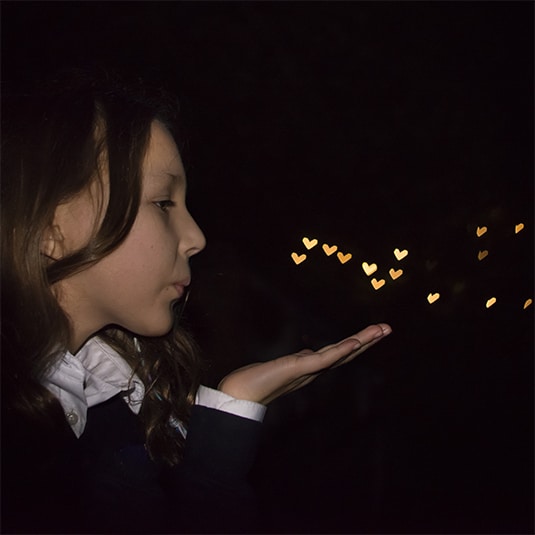
I still wanted to try something new. I had read somewhere that you can use the bokeh to create little shapes. If you photograph through a small shapes hole, your out of focus lights will take on that same shape, but nothing else in the picture will. All you need to do is a little arts and crafts. You have to create a sort of ‘cup’ that sits the wrong way round on your lens, with a little shaped hole at the bottom through which the light falls into the camera. In short: You cut out a piece of black cardboard that is the same size as the front of your lens. Then you choose a shape that is easy enough to cut out of the centre of that piece of cardboard (or hole punch it if you have a hole puncher that creates shapes). You then cut a strip of cardboard that you can snuggly wrap around the outside of your lens, tape this ‘roll’ so it doesn’t unfold and tape then attach it to the disc with the shaped hole. You should now be able to stick you lens into this cup. You can further secure it with the help of an elastic band around the lens. Much more detailed instructions can be found here.
The first image is actually a single exposure. I positioned my daughter far a way from some fairy lights in our garden and used flash to illuminate her. I took care how to position her. Hearts were easy enough to cut out…
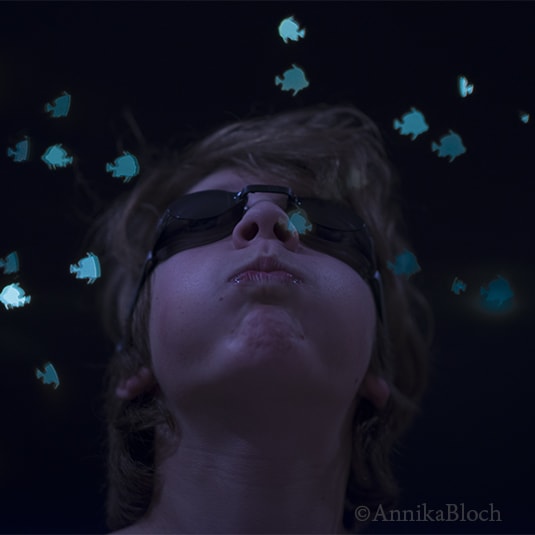
In this last image I combined the different ideas. The only shaped hole puncher I could find among my kids things was a fish shaped one. I was actually hoping for a a star or Christmas tree…Anyway, this was the shape I had to work with. To be honest, after a lot of fiddling with cardboard and sticky tape and elastics, I found that simply holding the piece of cardboard right in front of my lens did work very well, too. To make the fish look more like they were swimming around my son’s head I had to take two exposures of the fish: After the first one I turned the cardboard with the fish shaped hole around to let the next lot face the other direction (another advantage of just holding the cardboard in front of the lens). Now I had a proper school of fish and just needed my son to dive among them.
It feels good to get creative again with the camera. I will certainly be looking around for more shaped hole punchers to get inspired by…
Lots of interesting information for an amateur like me. Wonderful photographs of your children.
Thank you. Glad you like the post.