On my journeys through experimental photography I stumbled across physoautotypes. A glass plate covered with an emulsion of alcohol and resin is exposed in the sun and the image then developed over turpentine fumes. The process was invented by Niépce and Daguerre in 1832. They used silver plates instead of glass plates which they exposed in a camera obscura. The finished physautotype reminds a little bit of a Daguerrotype, but they seemed remotely achievable at home without specialist equipment.
This is a short video posted by Guy Brown that I found that shows really nicely how a physautotype can look like. Here displayed with a piece of acrylic mirror behind it.
Not even the tutors at college had heard about this process and the only place I could find anything about it was again alternativephotography.com. I tried to adhere to their instructions as closely as possible but sometimes I had to improvise.
I bought
- glass plates from a local joinery (they were kind enough to give them to me for very little money for arts and crafts projects as I wasn’t too fussy about the size)
- violin rosin
- methylated spirit (from the hardware store, as I could not get ethanol from the pharmacy)
- turpentine
First of all I needed to prepare my emulsion. Here you have two options: you can boil down lavender oil to get resin or you can buy violin rosin. I decided on the apparently much quicker and easier way and bought resin. I only used a little bit of it (it was supposed to be 1.5g but I could not measure the weight as my scales are not made for these tiny amounts).
I heated it in a bowl over a tea light to liquify it. This was much more difficult than I anticipated as it gets really, really sticky! It was really difficult to mix it properly with the methylated spirit.
I succeeded, even though I really can’t say for sure how much resin really went into the alcohol and the bowl become unusable after this. At least now I had enough emulsion for a lot of attempts!
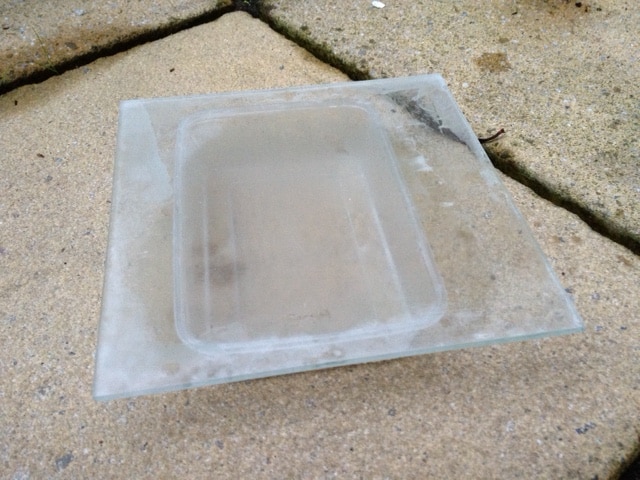
Next I had to clean my glass plates – properly. I used white powder (a mixture of equal parts of calcium carbonate, distilled water and alcohol) to degrease them properly and gave them an extra polish with alcohol.
Covering the plate evenly turned out to be the most difficult part of the whole process. I started by applying ca 3ml to my 20cmx20cm plate by syringe. I held the plate horizontally with my hand underneath and slowly and carefully tipped it in all directions to let the emulsion spread evenly. After only a few minutes I could see the plate frost over. However, this was nowhere near even. l tried to recoat, up to 4 times! but that seemed to take emulsion off again. My last, and best attempt was to pour a generous amount onto the plate, let it spread quickly and then poured the rest over one of the corners back into the container.

I let the plate dry in a dark place which took only about 1/2 -1 hour. Then I put a digital negative over it (printed on acetate) and covered the whole thing with another glass plate. Initially I used a picture frame to hold everything in place. I did not see the need for a proper contact print frame as you can’t see the exposed image anyway. Later I just sandwiched the two glass plates and the acetate together and secured them with clothes pegs. Much less hassle!


The exposure time was a guessing game. My first image was outside in bright sun for about 2 days, the second the same, the third about 1 1/2 days. The glass plate at this stage does not give you any indication about the image and exposure.
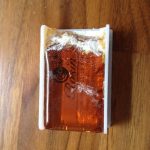
Then I had to develop my image. The tip from alternativephotography.com was to pour some turpentine into a takeaway container and this turned out to be a very good advice. I once tried to use a small bucket that I still had from some building works. Maybe there were still remnants from some other material in there or the liquid was too far away from the glass plate – the image appeared only very, very slowly. Using the shallow takeaway container I needed less turpentine and the image appeared much quicker. I did this stage outside because the turpentine fumes should not be inhaled. Placing the glass plate onto he take away box contained most fumes pretty well. Unfortunately the container was smaller than the area of my glass plate, so I could only develop that much of the image.
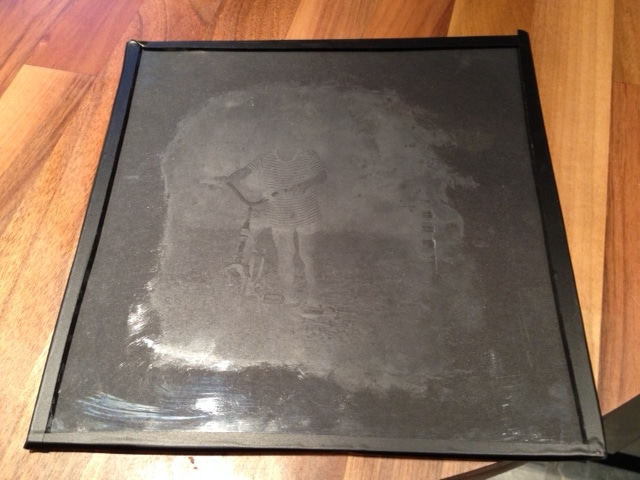
To see the image appear was the most amazing thing! The first plate was very unevenly coated and of the portrait I could mainly see one eye, but I still considered this a success.

The second attempt was completely useless but the third was much better than I had expected.
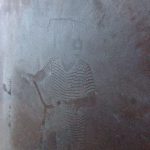
The image could best be seen agains the light or in front of a black background. I ‘mounted’ the glass plate onto a black cardboard and secured it with black tape. I placed the plate emulsion side down to protect it. Unfortunately, the edge where the image was not exposed looked very messy. So I used some alcohol to wipe these areas off. I was a bit scared that the alcohol fumes would be enough to remove some of the picture but luckily, the image was not destroyed. I let it air for a while and remounted it. As the image is best seen from an angle and sometimes the light reflexes help to see more detail, it was a bit difficult to photograph the finished picture.
What do you think of this technique? Worth the effort? I will certainly continue to experiment with this as this is, I think, something very unique.